Concurrent editing with Meteor

Concurrent editing with Meteor

Editing the same document at the same time by two editors is a key feature of an online IDE we’re currently working on. The application is built with Meteor. Which options are there to implement concurrent editing based on operational transformation?

Existing packages

Installing mizzao:sharejs edemaine:sharejs

Fortunately, Atmosphere provides us with packages which cater for this functionality. The most used one is mizzao:sharejs and its variants containing ACE and Codemirror as code editors. For analysis we’ll create a demo app using it:

meteor create ot-mizzao-sharejs
cd ot-mizzao-sharejs
meteor add mizzao:sharejs

In the next step we integrate the text area in client/main.html:

  {{> sharejsText docid="test" id="editor"}}

Unfortunately, starting Meteor gives us an error:

ReferenceError: ShareJS is not defined
     at sharejs-server.js (packages/mizzao:sharejs/sharejs-server.js:8:24)

The problem is known since over a year and can be fixed by replacing the package with edemaine:sharejs:

meteor remove mizzao:sharejs
meteor add edemaine:sharejs

This package is preconfigured to use an in-memory database for the transactions. To use Mongo, a settings file, e.g. settings.json, must be created and used for starting the server:

{
"sharejs": {
"options": {
"db": {
"type": "mongo",
"opsCollectionPerDoc": true
}
}
}
}
meteor --settings settings.json

Now, it works. 

No design, just functional: Editing the same document at the same time finally works.

Behind the scenes

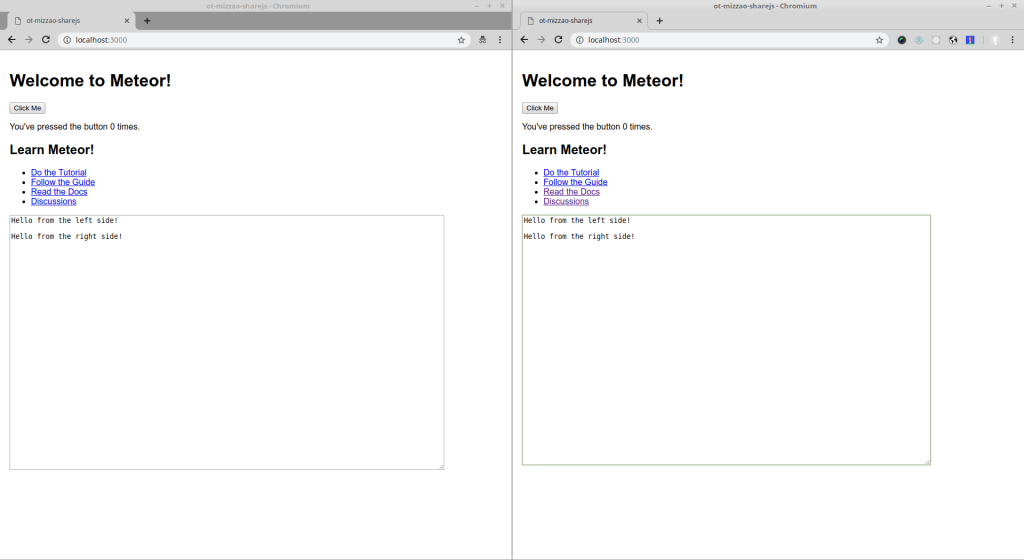
The network tab of the developer toolbar reveals the communication between the browser and the server:

Let’s take a look at the network tab!

It shows two connections:

  • The standard websocket connection of Meteor
  • A second connection using long polling for ShareJs

Using Mongo to store the transformations creates a number of tables:

The Mongo collections created for this example.

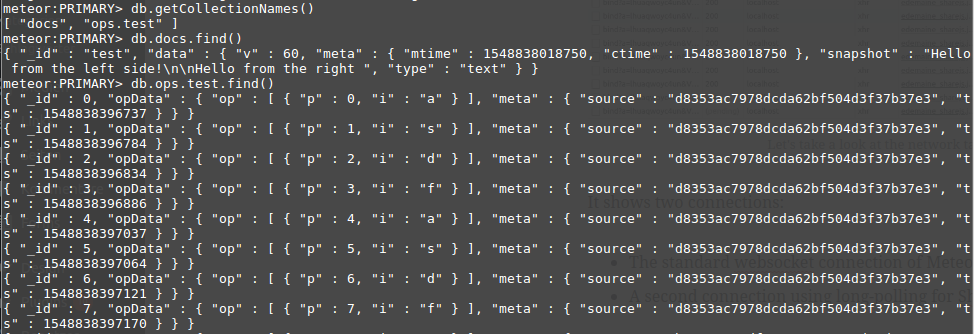
A docs table contains the content of all documents. For every document an ops table is created, just like ops.test in our test case. It contains the operational transformations.

Setting the option opsCollectionPerDoc to false will create only one table ops for all documents.

The pros and cons

The great advantage of this solution is the easy integration. It took less than an hour to get this feature working in a basic way. The server API of ShareJS is available to access the documents on the server.

I see the big disadvantage that this solutions creates something like a parallel universe to the Meteor data features, which already provide a real-time communication between client and server using websockets, which can be considered better for this type of communication. The browser opens a second connection to the same server, which needs twice the ports and thus more resources.

Alternatives

Use of native Meteor features for communication

The client does the diffing to generate the transformations. The transformations are collected by the server and written to a published collection (after adapting the transformation to the current state). The client subscribes to the collection and adopts the content of the editor accordingly (keeping in mind, that some transformations might not be processed by the server yet).

This would lead to a pure Meteor OT implementation.

Use the Meteor websocket for ShareJS

The websocket of Meteor is reused for the communication between ShareJS client and server.

This would give all the possibilities and optimizations of ShareJS, which is a well-tested piece of software. There are no API changes, so existing applications based on edemaine:sharejs or mizzao:sharejs will continue to work without any changes.


This project is supported by a netidee grant from the Internet Foundation Austria.

Photo by rawpixel on Unsplash

The VulcanJS Framework

The VulcanJS Framework

After the experiences with Pup I have looked at another part of the Meteor world. VulcanJS is not a boilerplate, but sees itself as a whole framework.

Starting with the cloning or forking of the vulcan-starter repository. Afterwards the necessary npm packages will be installed as well as with Pup.

git clonce git@github.com:VulcanJS/Vulcan-Starter.git
meteor npm install

The standard functionality of VulcanJS is significantly lower than Pup – so the installation is much faster. It takes less than 4 minutes for the Vulcan tutorial to be locally available for the first time – which is a bit more than half the time of what Pup needs.

However, there is a problem with the installation immediately: npm’s automatically running audit reports three vulnerabilities classified as “high” in the used libraries. In any case, the app should not be set productively in that form. However, the problem has now been resolved and a simple solution provided . In the current version 1.12.13 the problem has already been fixed.

The tutorial

The Vulcan-starter repository contains several tutorials that explain step-by-step how to use VulcanJS. Each tutorial runs locally as a meteor application and describes each step directly in the browser. If the mentioned files are changed accordingly, the website is updated automatically and the tutorial continues.

This makes it clear which change is causing what. Related adjustments, even across multiple files, are sometimes explained with alternative solutions. This makes the underlying system easier to understand for the user.

VulcanJS has been in development for several years. The name Vulcan is only used since version 1.3.2 – previously the framework under the name telescope nova was rather unknown. Originally started with the Meteor version 0.8. In order to get to the current state, the framework had to implement many refactoring work. In some places this is still noticeable. Not all tutorials adhere to current Meteor Guide rules and not all videos match the descriptions and the associated source code. But that does not matter much, as these tutorials will are updated bit by bit.

All in all, the tutorial leaves a safe, though not too deep, impression of the feature rich framework.

Another development approach

A direct comparison with Pup is not entirely acceptable, as the template and framework are targeted at different audiences and applications. At Pup you get a starting point for a working app. At VulcanJS, on the other hand, you get the tools needed to do this, including an enrollment. When developing a new app both approaches can be followed and here I would like to respond to the differences.

If you have started a project with Pup, then the current version of the boilerplate will inevitably be used as a basis for the project. A later update of this basis is relatively difficult, because you changed exactly this boilerplate for your own purposes.

This is different with VulcanJS. Your own application is developed from the beginning as a package, encapsulated from the framework. As a result, an update to a new version of VulcanJS can be performed easily and the code can be adapted to any changed functionality faster. If you need more profound changes in the process, VulcanJS offers different entry points in your own packages – so-called hooks.

How to understand this package-based architecture is explained in the documentation.

Furthermore, VulcanJS differs from Pup in the choice of packages used. Instead of Bootstrap or Fur, the styling is not bound to any particular library. Instead, the user can choose what fits. The separation between modules and UI elements with the extension .jsx in the file name is also helpful.

Instead of the graphQL Playground in Pup, VulcanJS uses the graphiQL IDE to access the graphQL API. Instead of prepared and separately stored resolvers, mutations and queries at Pup, VulcanJS explains what makes a resolver and collects related data together.

The initial database filling with random values ​​that was implemented at Pup with the in-house Seeder Package is missing from VulcanJS. Start values ​​are created here only statically – the contribution of a random component or interdependent data must be implemented by yourself.

VulcanJS also provides simple support for multilingual text output with the I18n Package.

Conclusion and recommendation

Basically I can say: The further and more limited the functionality of the app to be developed has already been specified, the more I would advise to use Pup. If the requirements are rather vague or if the skills in handling Meteor are not yet established, we recommend the use of VulcanJS.


A comment from the package maintainer

Sacha Greif commented the article on the Meteor forum:

Thanks for the review! You touched on it, but I think the key difference is that Pup is a boilerplate, while Vulcan is a framework. In other words the way Vulcan is architectured, you can easily add/remove/update packages at any point in your app’s lifetime, whereas with a boilerplate you’re kind of on your own after you start. I think they both have their pros and cons, like you pointed out.

(I also think Vulcan and Pup might differ when it comes to actual features, but I’m not familiar enough with Pup to really say)

https://forums.meteor.com/t/review-the-vulcanjs-framework/47749/2


Boilerplates for prototypes

Boilerplates for prototypes

A good start is half the battle..

Such or similar statements also apply to the development of web applications. Anyone who starts with the right tools, in a suitable environment and with a solid foundation, may later not have to tediously restructure the app. Design patterns and best practices in general are often taken very seriously in boilerplates, giving the developer clear guidelines.

With this mindset I have looked at the “Ultimate Boilerplate for Products” Pup from cleverbeagle.com. This is a template for the development of a web application based on Meteor, React, MongoDB and GraphQL. Subsequently I want to answer the question to what extent boilerplates help us with the development of prototypes and when they may actually hinder us.

What does Clever Beagle’s Tool Pup have to offer?

With the installation of Pup (currently in version v2.0.1) you get the executable source code of a small web application for managing Markdown documents. The app contains components to realize the following tasks:

  • User registration via OAuth and user administration via an admin panel
  • Sending e-mails based on HTML and text templates
  • Automatic generation and indexing of a random database set
  • Table definitions via GraphQL and an own GraphQL Playground
  • Create a sitemap and SEO metadata with app details
  • Routing setup for public and authenticated requests
  • Server side rendering (SSR) for faster presentation in the browser
  • Form validation
  • Styling and customization via bootstrap and styled-components
  • Browser policies for protection against XSS
  • Data export, account deletion and declaration of consent according to GDPR / DSGVO
  • Local git repository with an own Linter Script Hooks
  • Unit and end-to-end (E2E) tests
  • Configuration for Development / Staging / Production Settings
  • Complete workflow for app releases and continuous integration including DNS entries, SSL certificates and hosting on Meteor Galaxy (Requires additional access data)

This list is constantly being expanded, as Pup always strives to relieve the developers even more and cover more areas through this boilerplate.

Continue reading

Meteor success story: Teams & Scores

Meteor success story: Teams & Scores

A few weeks ago we delivered the Meteor application Teams & Scores to the Regional association of sport clubs for target shooting in Burgenland.

The main target of the application was to provide an easy way to collect the results of competitions. Flexibility was a core quality, as the score calculation is different from discipline to discipline in target shooting. So, the application can be used for other sport activities as well.

It includes the management of the associated clubs and their members. The permission model is based on the email address of the members and allows the editing depending on their role, e.g. the director of a club may create and edit club members, a club member may edit his own entry, etc.

The application was built immediately after the release of Meteor 1.3. I tried to implement it according the fresh Meteor guide, so I could provide feedback and pull requests to improve the guide. The developer experience using Meteor was as fruitful as expected. The upgrade to the new version brought several changes, the new application is completely based on JavaScript modules and ES6. It uses Blaze for templating and the Flow Router. The Meteor guide was a good source of inspiration, as well as Exploring ES6 written by Dr. Axel Rauschmayer.

The customer is very happy with the new application, is it offers an up-to-date user experience for the competition directors, who enters the results, as well as for the users, who want to look up their scores and standing.

The next step is the implementation of team-based championships.

The application is available at http://bsslv.meteor.qnipp.com

Meteor packages: Cleaning the package cache

Meteor packages: Cleaning the package cache

Meteor downloads all the packages in the user directory in ~/.meteor/packages. There is no command to clean up this directory, as Meteor doesn’t know the dependencies of all the applications on your computer.

As my partition is always too small, I just wrote a one-liner to solve this problem:

cd ~/.meteor/packages; for i in * ; do pushd $i > /dev/null; ls | sort -V | head -n-1 | while read v ; do rm -rf $v .$v* ; done ; popd ; done

This will delete all but the newest version of every package. If an application needs an older version, it will be downloaded and re-installed by the next start of this application.

It saved me 2.5 GB today. The script works very well in Linux, it should work on Mac OS X as well.

If you delete the link to the meteor command line tool by mistake (it happened to me in the first version of the line above, which contained a bug), you can use the following command to recreate it from the newest version available:

cd ~/.meteor/packages; ln -sf `ls -d packages/meteor-tool/* | sort -Vr | head -n1`/mt-os.linux.x86_64/meteor .

Use all the commands with caution and at your own risk.

Meteor boilerplates: an actual overview

Meteor boilerplates: an actual overview

You want to start a new Meteor project? Instead of starting from scratch with an empty directory and no packages, you could take an existing boilerplate. There’s no official boilerplate, but a number of them are provided by the community.

Meteor boilerplates

The list contains at least the link to the respective Github page. I haven’t tested them, as I created the list as starting point to find a suitable boilerplate for my next Meteor project.

AuthorLatest CommitLanguageRouterTemplateDesignSEOAutoformTable ViewUser and roles administrationCLI
Meteoris11.11.2015JavaScriptFlowBlazeBootstrapmeteoris:grid-view
matteodem24.09.2015JavaScriptIronBlazeSemantic UIms-seoorion
Differential04.09.2015JavaScriptIronBlazeBootstrapblaze-meta
Differential02.09.2015JavaScriptIronBlazeMaterializeblaze-meta
patrickocoffeyo21.10.2015JavaScriptIronBlaze
yogiben (MeteorFactory)15.01.2016CoffeeScriptIronBlazeBootstrapms-seo
webtempest04.09.2015CoffeeScriptFlowBlazeBootstrap
AdamBrodzinski25.09.2015JSXFlowReact
joerobmunoz23.12.2015JavaScriptFlowBlazeMaterialize
cowFipps27.11.2015JavaScriptIronBlazeMaterialize

And what else?

Generators

The boilerplate by @matteodem contains the command line utility orion to generate the folder structure for the application.

iron-cli is a scaffolding tool for Meteor, which generates the directory structure for Blaze templates, collections, routers, etc. (Tutorial)

Yeoman is a tool for all kinds of web applications, and Google finds various generators for Meteor applications, e.g. for Angular (very active project) and React.

Meteor Kitchen

A different approach ist taken by Meteor Kitchen. The complete application including views, models, navigation structure is generated by a single configuration file. Unfortunately, the project is not published as open source (yet).

My opinion

I’m still choosing the starting point. Let me know your opinion by commenting on this post.